Disclaimer: We sometimes use affiliate links in our content. For more information, visit our Disclaimer Page.
It seems that every other day a new social media platform emerges. And if you’re like me, you feel obligated to at least create a basic account so you can stay connected with friends and family.
If you’ve decided to add a Snapchat account to your list of social media accounts but don’t know how to make a public profile on Snapchat, this step-by-step guide is for you! I’ll walk you through each step so your profile will be up and running in no time.
At the end of this article, we will also discuss how to change your Snapchat location on Android. To do this, we recommend using a UK VPN server to ensure security and privacy.
Let’s get started!
Different Kinds of Public Profiles on Snapchat
Before we continue, it’s essential to distinguish between the types of public profiles. Two main ones can be created without approval, while the third option requires an application to be filled in.
1) ‘Public Profile.’
This type of Snapchat profile is created by any Snapchat user and is different from the other options in that it can be found via search or when looking at a list of your friends. The only content it allows is the stories, and all interactions are public.
2) ‘Brand Profile.’
This profile is created by a company community, brand, or person and requires an application. The main difference is that you can add a touch of your style, upload custom emojis, and use Snapcode.
3) ‘Community Profile.’
This is created by a group of people who commonly upload content. For example, if you are part of a specific fandom, you can make the Community Profile.
What is a Public Profile on Snapchat?
The public Profile feature for Snapchat accounts allows people to have the ability to add their friends even though they do not know them personally. So everyone sees the Public Profile, so anyone can add you no matter your location or who your mates are. This is different than Snapchat’s “My Story,” which is only for your companions who follow you to see.
Eligibility criteria for Snapchat’ Public Profile.’
Many social media managers have been raving about Snapchat’s new insights features in the past few months. [In case it is not apparent, it is a reference to Snapchat’s recent “Public Profiles” for creators.]
To check them out, I applied to the program, and, to my surprise, I was granted a Public Profile with full access and Analytics within two days.
First of all, let me clarify that this Public Profile is not confused with Snapchat’s Mentions, which they just released this past week.
A public Profile is when you create a page for your channel or channel’s content that can be seen in the ‘Add Friends’ section of every user in Snapchat.
It is meant for regular users with accounts at least a few months old, with regular posts and interactions in the past.
To be considered by Snapchat’s team, you will need to apply for the program, and you should meet all the basic requirements below:
Requirements:
- You must be a content creator or a media company with a large following
- You must have been on Snapchat for a few months
- Your account must have an average of 1 post per day
- You must have a subscriber count of more than 5000
- You can upload videos of any length
- Your account must be in public mode
- You must not violate the Snapchat Terms of Use Agreement.
Related: SocialPilot Review
How to make public profile on Snapchat?
Snapchat has started giving everyone Public profiles. So Snapchat users can now see people’s names and see theirs. But this update is being released in different parts of the country, and it might take a few days to show up on your phone, depending on where you live.
Note: If you don’t have access to the ‘Create Public Profile‘ option, consider using a VPN to change your location to the United States. You can use Super VPN. This technique appears to operate only for a select group of people. If it doesn’t work for you, wait a few days until Snapchat adds the Public Profile features option within your region.
Going Public on Snapchat
Let’s talk about how you can create a public profile once this feature is available to you. Follow the below steps.
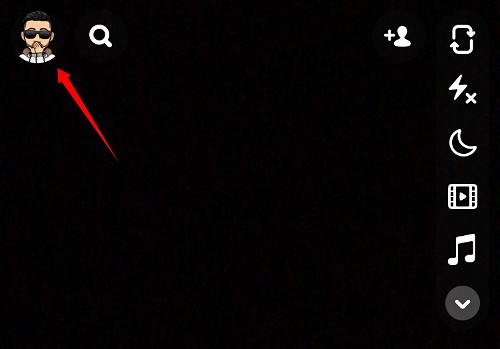
1) Open Snapchat. Tap on the “Profile Photo” Or bitmoji icon at the top left corner of your camera screen.
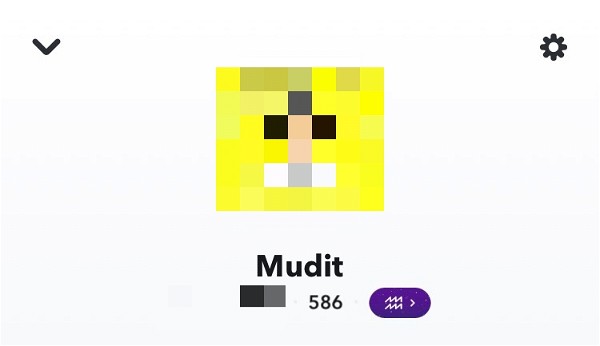
2) Next, Tap the “gear icon” at the top right corner.
3) Scroll down to the section “Who can…” where you’ll make the following modifications to each option in it.
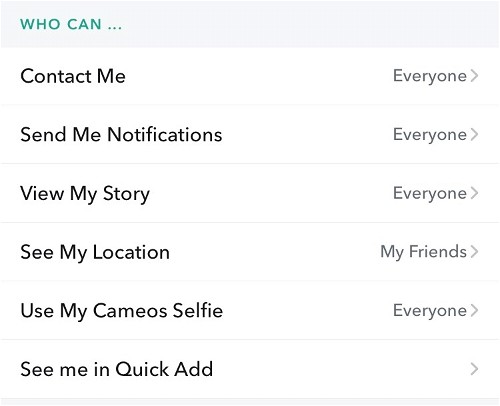
- Contact Me: Everyone
- Send Me Notifications: Everyone
- View My Story: Everyone
- See My Location: My Friends
- Use My Cameos Selfie: Everyone
- See Me in Quick Add: Turned On
4) Close Snapchat and restart it after making the necessary modifications.
When you have finished with your profile, it will be seen by anybody in your friend circle. They will then be able to contact you.
Create a Public Profile on Snapchat
1) Open the Snapchat application on your mobile device and Tap the “profile picture” Or story icon in the upper-left corner of the screen.

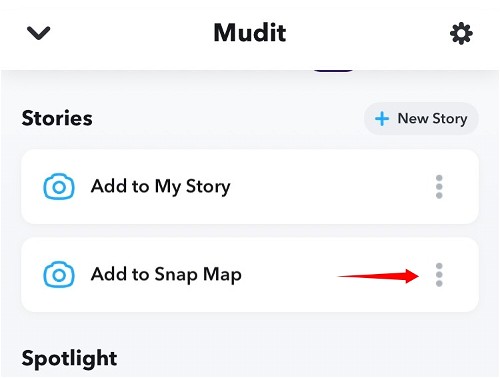
2). You should have a new option called ‘Add to Snap Map’ under the ‘Stories’ or the ‘Spotlight & Snap Map’ depending on your device and version of the app.
3). Now tap on ‘Create Public Profile.’
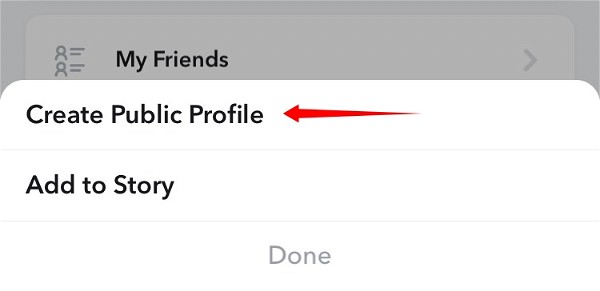
4). All exciting features accessible through a Tier 1 Public Profile will be introduced to you via Snapchat. To proceed, tap the bottom of your screen on ‘Continue.’
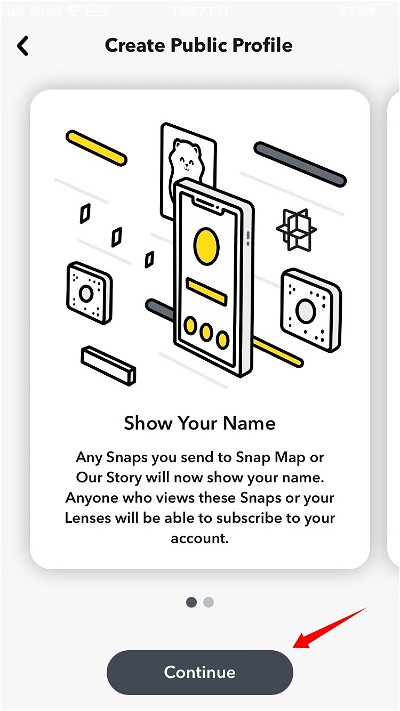
5). Now tap on ‘Get Started’ at the bottom.
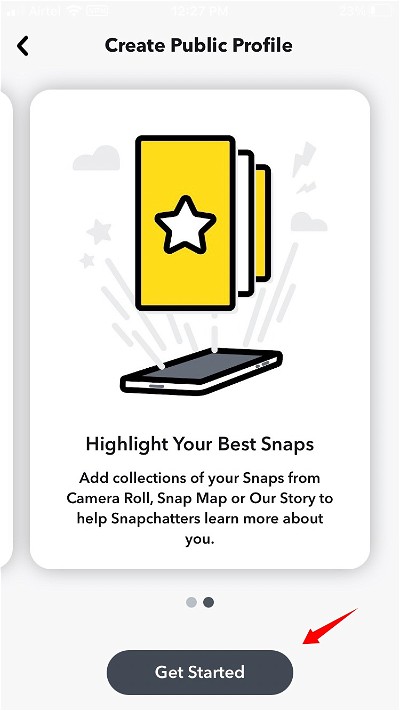
6). For one last time, Snapchat will display you a warning about creating a Public Profile. Tap on ‘Create’ to proceed to the next step.
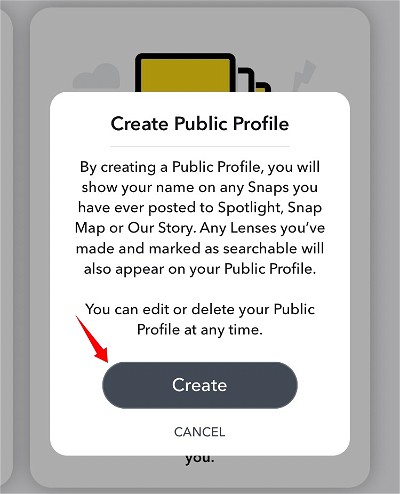
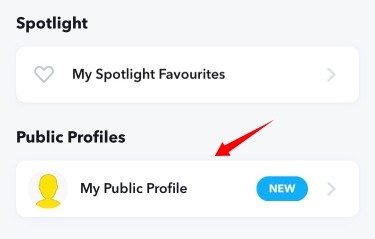
7). You should now be at the ‘Settings’ page, and there should be a new section called “Public Profiles” with a new “My Public Profile.” Tap on it to get started.
8). Now tap on ‘Edit Profile’ to edit all the details included in your public profile.
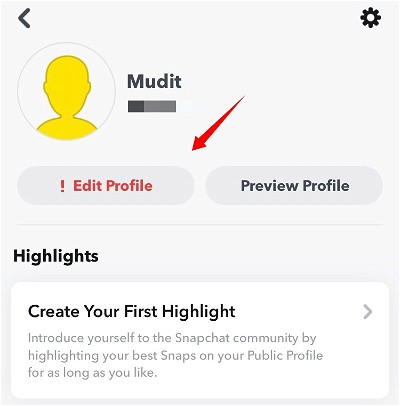
And that’s it! You now have a new Public Profile on Snapchat!
You will want to ensure that you do not omit any of the above steps. Otherwise, you will end up with an error message when trying to access your profile.
Difference between ‘Going Public’ and ‘Public Profile’
The ‘Public Profile’ provides Snapchat’s new features. Apart from this, Snapchat has a ‘Snap Star’ profile with additional profile features compared to a Public account.
A new take on a current account with a Public Profile is like having a fresh start. Your public profile will be a completely separate area with privacy settings, articles, and highlights.
‘Going Public’ means that people who are not your friends can see what you post. This has been available for a while, and going public allows your connections and groups to publicly see your stories and snaps.
Benefits of public profile on Snapchat
A Public Profile allows you to be found in the app, promote your creativity, and assist fans in seeing you on Snapchat.
Public Profiles can utilize a distinct set of profile tools that allow you to showcase Lenses and Stories, separate Subscribers from friends, and more to help them find you! Some of the features are listed below:
- Snap Map and Public Stories exposure on content.
- You can see your name on all Snaps that are publicly shared straight from your Camera Roll.
- You can show the subscriber count.
- Finally, a subscribe button that your viewers can use to join your mailing list.
- Your lens studio will be shared with the public (included are your own as well as preferred items)
Change your Snapchat location on Android
- Sign up for a reliable VPN provider.
- Download the VPN mobile app from Google Play
- Open the VPN app and head to Settings
- Enable the Override GPS Location option
- Open your phone Settings and locate your Build Number
- Tap on the Build Number seven times, and a message should appear stating that you are now in Developer Mode
- In the Developer options, scroll until you see Select Mock Location App
- Select your VPN, and the process is complete!
Related: Where is Ad Manager on Facebook
Final Thoughts
In this How-to Guide, I’ve walked you through the process of creating a public profile on Snapchat. It’s been my experience that once people create their accounts and start using them for personal use, they often find themselves wanting to share more with friends and family.
As a result, many decide to make their accounts public so others can follow them too! If you’re interested in making your Snapchat account accessible to anyone interested in following what you have going on daily, just read these simple steps below.
Note: We cannot guarantee that you will be eligible to create Snapchat’s public profile. Please consider using a VPN to change your location to the United States if you don’t see any option. This approach appears to work only for a specific subset of individuals. If it doesn’t work for you, wait a few days until Snapchat adds a Public profile option within your region.
Please feel free to share this guide with your followers if you find this guide helpful. So we can get connected as well. Also, if you have any questions in your mind, feel free to start a conversation below.


